
Microphone Placement for Clear, Consistent Voice Over
Find a practical microphone position for voice over with distance and angle tests, plosive fixes, and a repeatable setup for narration and voice samples.
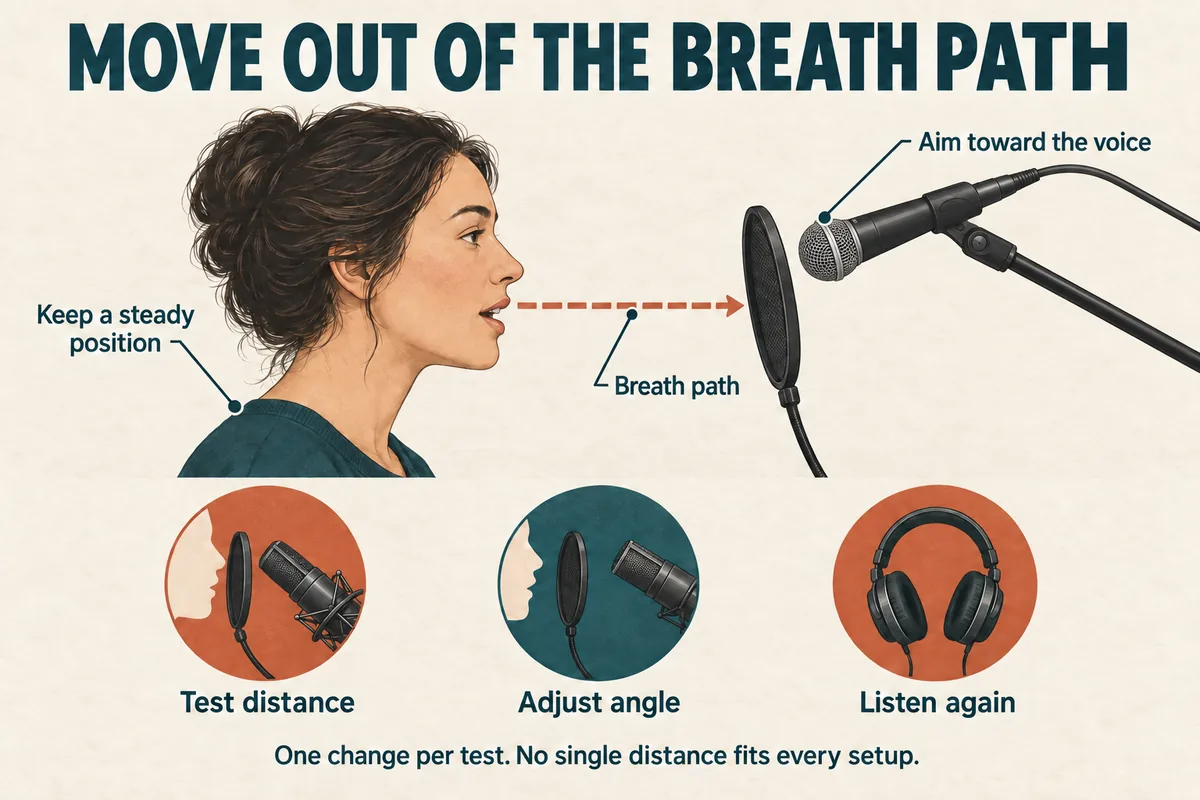
For clear voice over, begin with the microphone near your mouth, slightly outside the direct path of your breath, and in a position you can maintain comfortably. Then record short tests at different distances. The best placement is the one that gives your particular voice a clear, steady sound in your particular room.
Distance is a starting point, not a guarantee. Microphones differ, rooms differ, and the position that sounds impressive for one sentence may be difficult to maintain through a ten-minute tutorial.
Find the microphone's intended speaking side
Before changing software, check where the microphone receives sound. Some microphones are designed to be spoken into at the end; others receive sound from the side. Look at the manufacturer's diagram rather than guessing from the shape.
Set the microphone on a stable stand. If it sits on the same desk as your keyboard, record a test while moving your hands normally. Any transmitted knocks or vibrations will become part of the recording unless you change the setup or your movement.
Put the script close to your natural eye line. Looking down at paper and back up to a screen can change your distance and direction without you noticing. A comfortable seated or standing posture is easier to repeat than a pose that looks good on camera but strains your neck.
Compare three distances with one sentence
Choose a sentence containing a few strong consonants and a quiet ending: “Please place the blue folder beside the screen, then check the final page.” Use exactly the same sentence for every test.
Try three plausible positions, such as approximately fifteen, twenty, and thirty centimeters from the microphone. These are comparison points, not required settings. Record each position in a separate labeled take and use a similar speaking effort.
Listen for four differences:
- Does the voice sound clear or distant?
- Does the low end become heavy or muddy?
- Are breath thumps more obvious?
- Can you hear more room sound around the words?
With directional microphones, moving closer can add bass through proximity effect. Shure's microphone placement guide discusses this behavior. More bass is not automatically more clarity, especially when several sentences are played consecutively.
Choose the most balanced test. You can adjust gain after choosing a workable position, then record another check.
Move the microphone out of the breath path
If P and B sounds create low thumps, first make a small physical adjustment. Place the microphone slightly above or beside the direct line from your mouth, while still aiming its intended receiving side toward you.
Repeat the same sentence. Do not change distance, input gain, and speaking style all at once. One change per test makes the result easier to understand.
A pop filter can be useful and can also provide a visible reference for keeping your distance. It should not force you into an uncomfortable posture. Do not lean against it or use it as a physical support.
If the voice becomes dull after a large angle change, move back toward the previous position and try a smaller adjustment. The objective is to reduce the breath impact while retaining the sound you liked.
For strong S sounds, listen to a separate sentence such as “Save the session and choose the second version.” Slight position changes are worth testing before applying aggressive processing.
Keep the position consistent during a real passage
A single test sentence can hide movement problems. Once you choose a position, read a paragraph from the voice cloning sample script. Include a question and a longer sentence so you can hear whether your posture changes with the delivery.
Notice what happens when you glance at the next paragraph, gesture, laugh, or take a breath. You do not need to remain rigid. You need a setup where normal movement does not create distracting changes.
Mark the stand location and chair position with something removable. Make a brief note of the approximate distance. For recurring sessions, a quick photograph helps you reproduce the setup.
If you use a phone, the same test method applies. Place it securely, keep its microphone openings clear, and compare positions using the exported recording. Do not assume holding it closer throughout a long take will be comfortable or consistent.
Separate placement problems from room problems
Moving a microphone cannot solve every recording issue. A fan beside the desk, a rattling stand, and a reflective empty room need different adjustments.
Make a short recording with the noisy appliance off when that is practical. If the sound improves immediately, you have identified a source worth addressing. Avoid moving the microphone endlessly around a problem you could remove directly.
For room sound, compare recording positions and listen to the ends of sentences. A voice that becomes more distant every time you back away may benefit from a closer position, but check that closeness does not introduce other problems.
If you already have a recording with mild background noise, see how to remove background noise carefully. The preferred reference is usually the take that requires less repair, because it is easier to evaluate.
Save a setup recipe
Create a small note you can reuse:
- Microphone and intended receiving side.
- Approximate mouth-to-microphone distance.
- Angle and pop-filter position.
- Chair, stand, and script location.
- Input level and a sentence used for checking.
- One short approved recording for comparison.
At the next session, compare your new check with that reference before recording the whole script. This takes less time than trying to match a different sound during editing.
For voice cloning, placement is only one part of the preparation. Use the broader voice sample recording checklist before selecting the final reference.
Placement questions
Is closer always better? No. Closer may reduce the relative room sound but can change tone and increase breath problems. Compare actual recordings.
Should I point the microphone away from me? Usually you want its intended receiving area aimed toward the voice while managing breath direction. Large angle changes should be judged by listening.
Do I need expensive equipment to start? Start by testing the equipment you already have. A stable, repeatable setup gives you useful evidence about whether hardware is actually the limitation.
Try Our Voice Clone Demo
Hear your words come to life
Choose a voice and try a short preview.
Listen to sample voices
Hear examples before choosing a voice. Generated results can vary with the script and reference sample.
Looking for another voice?
Explore the library and listen to a sample before you create.

Morgan Freeman

Stephen Hawking

Christiano Ronaldo

Donald Trump

Kokoro

Disney XD Announcer

Cute Japanese Girl
Vin

Adam Stone
Transform Your Content with AI Voice Technology Today
Try a short voice preview, then create speech and save your audio in a workspace built for your next project.
Generate Your Voice Now